Link to here : https://excelfox.com/forum/showthrea...l=1#post158903 https://excelfox.com/forum/showthread.php/2769-P2P-Cloud-DVR-remote-Access-via-a-(remote)-PC-Using-Guarding-Vision-PC-Client-Software?p=15896&viewfull=1#post15903
https://excelfox.com/forum/showthrea...are1#post15903
https://excelfox.com/forum/showthread.php/2769-P2P-Cloud-DVR-remote-Access-via-a-(remote)-PC-Using-Guarding-Vision-PC-Client-Software#post15903
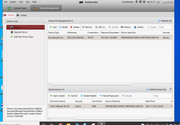
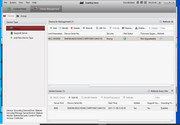
1-4). Run Guarding Vision software for the first time and register the administrator account.
Introduction and discussion of the way I have chosen to proceed with the explanations
The main purpose of all my Blog here , is to get the remote Access via a (remote) PC using Guarding Vision PC Client Software
We do actually have enough information to do this , at this stage, from a remote source which is away from where the DVR. In other words, theoretically, we could proceeded as if from now on
_ we have no direct access to the DVR
and also
_ our PC has no direct ( LAN cable or WLAN wireless connection ) connection to the same router / modem to which the DVR is connected. ( But note*** , that the DVR must have a reliably working internet connection via the LAN socket to a router/modem or some other means to connect it to the internet: It must be “On line” )
In other words, we could proceed as if we were travelling “away from home” and have our PC or Laptop with us
However, it is much easier to understand, and has a better chance of initial and later success, if we proceed in a more logical progression.
In this logical progression we will in the next section remain “at home” , or physically close to the DVR.
So we are assuming that we unpacked and did the initial first quick set up and are still using the (i) most simple use of the DVR and cameras and monitor (i) ( and have the mouse still connected to the receiver )
We will then go on to the next way, (ii) , the “local LAN way”, to use the DVR, which is local PC use of the DVR
Finally we will go on to the P2P Cloud way, (iii) , which is the remote PC way
We note that at this final stage we will still be coincidentally connected to the same router / modem as the DVR, but this is just because of the way we have decided to progress in order to set up the final P2P Cloud way. However, at this final point we need do no more than simply take our PC to some remote point , ( theoretically anywhere in the world!), and as long as we can connect hat PC in some way to the world wide web internet at this remote location, then if all has gone well, we should be still able to access the DVR, that is to say view using the cameras that are connected to the DVR, and the pictures should appear close to real live time on out PC screen. This last functioning arrangement is the main goal of my entire Blog here . At that point , this Blog is finished, although note that we will discus the three different ways to get at the final P2P Cloud way: _ -A- _ -B- _ -C-
Remote ( Cloud P2P ) Access of DVR over the internet with a PC using Guarding Vision Windows PC Client Software,
2b) -A- ______ Following on from previously obtaining LAN local access, and
Adding ( making available ) DVR for remote Cloud use for the first time: DVR is not yet Registered for P2P remote Access
https://excelfox.com/forum/showthrea...ll=1#post15912
2b) -B- Cloud P2P remote access if you know the password and username of Sannce registered account holding DVR P2P relevant information
https://excelfox.com/forum/showthrea...ll=1#post15918
2b) -C- Cloud P2P remote access if no Sannce registered account holds DVR information
Possible Problem! Need to remove details of DVR from Sannce registered devices
https://excelfox.com/forum/showthrea...ll=1#post15919
***Very important, is to have a working strong internet connection to the LAN socket via a LAN RJ45 Ethernet cable to your Router or modem, https://i.postimg.cc/wMbWK1Wm/Router...o-computer.jpg .
If you have a successful working internet connection, the furthest most green of the lights at the front , https://i.postimg.cc/1tkMmkGW/DVR-BN...t-internet.jpg , of the DVR should flicker on., https://i.postimg.cc/W3ggnhZn/Right-...g-Internet.jpg . The brightness of this light gives an approximate indication of the strength of the signal. If you have no green light or just a weak dim light, you might consider changing the LAN RJ45 Ethernet cable , possibly to a shorter one. My experience suggests that the DVRs from Sannce require a better and stronger LAN internet connection than most average computers and other devices do. I have also had two DVRs fail / become defect/ useless , at least as far as using local PC LAN (ii) or PC Cloud P2P (iii) is concerned, when they no longer reacted to any working LAN connection ( https://support.sannce.com/hc/en-us/requests/1492131 )


 Reply With Quote

Bookmarks