
Some notes related to Snipping Tool


Some notes related to Snipping Tool
Last edited by DocAElstein; 09-30-2024 at 12:10 PM.
Some notes related to Snipping Tool
Snipping Tool screenshots including for pop ups and drop downs (in particular Vista , Win 7 Win 10).
It can be useful and helpful for both the helper and those asking for help to have a simple snap shot of something on the computer screen . Taken internally using software, is both more convenient and will almost always get a better quality, then manually taking a picture such as with a camera . Using the Shift + Print key combination will usually put the screen as you see it, (or multiple screens if you have them, as a picture in the clipboard.
It is rare that you need all the screen in the picture, as usually you just want to pass on a picture of some part of it. We often refer to such a picture as a snippet of the screen, and/ or we refer to making such a picture as taking a snip, or snippet of the screen. We could manipulate the picture of all the screen/screens, but various software is available to make a snip
For a long time, since Vista operating system, a simple such software was shipped with windows, called Snipping Tool.
It was liked by many, worked well, and even got a bit better early into windows 10. Characteristically for Microsoft, it was phased out, or attempted to be phased out. ( Putting that in more formal terms … The history of Snipping Tool is typically Microsoft: it was to be deprecated and replaced with Snip & Sketch. But it was not discontinued.
Then later, features from Snip & Sketch were merged into Snipping Tool, and Snip & Sketch is no longer part of Windows 11, as far as I can tell. )
Coming back to more simple terms, Microsoft have messed it up in a cunning way in and towards windows 11 because it was good and what they tried to replace it with was crap, possibly because they spent too much time trying to hide stuff in it and/ or integrating it into some other spying system in their attempt to make you subscribe to them, effectively having like a console connected to their main frame computer, and which you rent from them obediently.
Getting started for the first time
If you have an older operating system, from Vista onwards, and you never heard of Snipping Tool, then bottom left click the Microsoft symbol, start typing in Snipping Tool in the search bar, and you should get offered it. Click on that will launch it, but for more convenience later, do a right click copy on it and a right click paste onto your desktop and you should get a icon to launch it from.
https://i.postimg.cc/sxzH1JMW/Get-Sn...time-Vista.jpg
Get Snipping Tool first time, Vista.jpg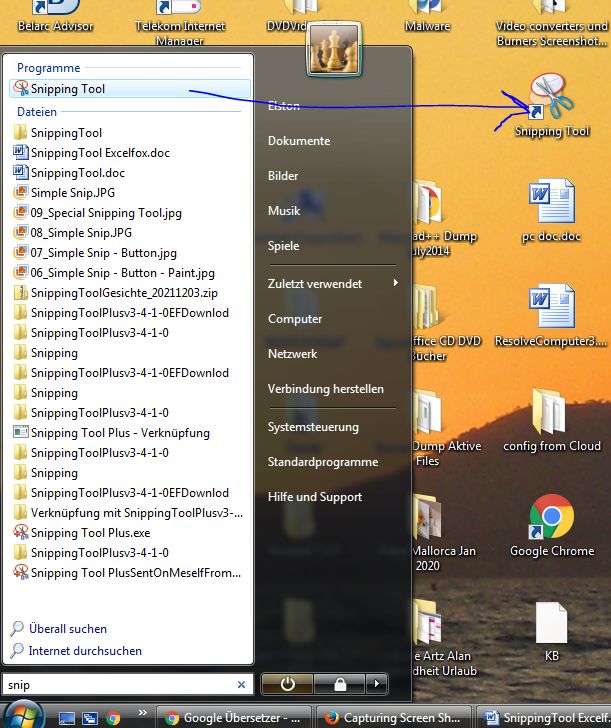
Furthermore, drag that icon onto the Microsoft symbol, and you should thereafter have it there available as one of the quick start symbols when you next click on that Microsoft Symbol
https://i.postimg.cc/cHw5szLZ/Get-Sn...start-list.jpg
Get Snipping Tool into quick start list.JPG
Using Snipping Tool is fairly intuitive. After launching it for the first time, move your cursor somewhere, hold down the left mouse bottom down and drag somewhere then let go. The rest of the fairly simple functionality can be found out quickly by a bit of playing around
For the newer operating systems, especially if they are still "supported", it is difficult to generalise, as Microsoft mess around changing things, but the start point is usually to find a search bar somewhere and try to follow a similar procedure.
Getting a screenshot with a pop up or a drop down list.
A problem can arise here as a pop up or dropdown may vanish as you attempt to launch Snipping Tool or make a New screenshot once it is running. In many such cases Snipping Tool has a solution for that: After either launching Snipping Tool after hitting New, hit the Esc key. Now you can get your pop up or drop down, and then hit the key combination of Ctrl + Print. In most cases Snipping Tool then runs with the pop up or drop down still there.
Last edited by DocAElstein; 10-03-2024 at 12:07 AM.
Windows 11 and "Snipping Tool""Snipping Tool" in Windows 11.
Snipping Tool was to be deprecated and replaced with Snip & Sketch in the Windows 10 period. But it was not discontinued …. possibly as a lot of people liked it in preference to Snip and Sketch, that is what I heard/ picked up at the time. It seemed to get a bit messy around the windows 11 time, …. features from Snip & Sketch were merged into Snipping Tool, and Snip & Sketch is no longer part of Windows 11 , .. maybe … perhaps.
It’s a bit confusing, as we have that name now Snipping Tool in Windows 11, but it works a bit differently to the Snipping Tool from the Windows 10 period. (Exactly what they did and why and what we have got will be proprietary info I guess.. left to us to guess, or smarter people may have better inside information)
"Snipping Tool" in Windows 11 for a pop up or a drop down list
It’s a bit quirky and inconsistent,
Here is a couple of ways that seem to work, sort of.
Method 1
_ launch Snipping Tool,
_ choose New to create a new snip,
_ press the escape key, ( then get the drop down or pop up you want to take a screenshot of )
_ press the three keys, Microsoft Symbol and Shift and S simultaneously ………
_ You now have the familiar darkened screen or greyed screen , with the default snip type being that familiar one where you hold the left mouse button, drag around a bit ,then let go and you end up with a rectangular snip.
But, Now here’s the catch: Snipping Tool does not open in windows 11 at this point in the way it does in Windows 10 at this point after you made your snip, and for me nothing is visible**. (I am taking a wild guess that what is going on here is some incorporated feature from the discontinued Snip and sketch.)
However, all is not lost, as it where, at least the saved screenshot is somewhere, for example, - it seems to be in the clipboard.
You can then paste that somewhere, such as in a Word document, and do a simple snip with Snipping tool of that.
Method 2
This is sort of like method 1 without the first 3 steps.
( first of all get the drop down or pop up you want to take a screenshot of )
_ press the three keys, Microsoft Symbol and Shift and S simultaneously ………
_ You now have the familiar darkened screen or greyed screen , with the default snip type being the one where you hold the left mouse button, drag around a bit ,then let go and you end up with a rectangular snip.
But, Now here’s the catch: Snipping Tool does not open, ….. etc. etc. as in Method 1
I have heard it said many times that after the snip is taken in windows 11, a notification is given that gives you some options of what to do with the image you now have in the clipboard. But this has never worked for me on my only windows 11 machine. ( I have checked in Settings – Notifications – Snipping Tool , and everything is turned on. ( I have windows version 21H2 (Build22000.675) , and on this particular machine I have rarely messed around with, or changed, any default settings. So it's pretty well "out of the box", that is to, say, as Microsoft want it to be.) )
Last edited by DocAElstein; 10-03-2024 at 01:10 AM.
In support of this post
https://excelfox.com/forum/showthread.php/2769-P2P-Cloud-DVR-remote-Access-via-a-(remote)-PC-Using-Guarding-Vision-PC-Client-Software?p=15907#post15907 https://excelfox.com/forum/showthread.php/2769-P2P-Cloud-DVR-remote-Access-via-a-(remote)-PC-Using-Guarding-Vision-PC-Client-Software?p=15907#post15907
#_ Standard Device Selection (Selected by Default) ( Default standard device selected on/by opening software: Device )
A Default device type has been opened/selected automatically
( #_ A “Standard device” could be any directly / locally connected device so can include our PC LAN Access )
What all the current literature does not explain very well is that, by default, the Guarding Vision has one Device type by default selected / highlighted in brown,
https://i.postimg.cc/vH04cL3V/Device...ype-Device.jpg
_ Device
________Device Managemant
_Device Type
_#_Device__
The viewing on a computer via Guarding Vision Software, of a camera , or cameras, which are connected to the DVR can be done at any subsequent time via the uppermost small View tab,
https://i.postimg.cc/SK2nSyVY/View-M...-first-use.jpg
View
_#_Main View______
,( but note that after the first time of taking this action , an extra larger Main View main tab will appear and from then on it is always there , https://i.postimg.cc/rp5GgCWp/New-Ma...se-of-View.jpg )
_#_Main View_
_#_Device ___________
_#_Device _( Local )____
_#_Device _( Local )____
_#_Device _( Local )____
_#_ Cloud P2P Device ___
_ Device
________Device Managemant
_Device Type
_#_Device ___________
_#_Upgrade Server _____
_#_ Cloud P2P Device ____
_ Device
________Device Managemant
_Device Type
_#_Device ___________
_#_Upgrade Server _____
_#_ Cloud P2P Device ____
_______Register_______
_ Device
_#_Control Panel______Device Management_
_Device Type______________
__#_Device ____________
_ _#_Upgrade Server _____
_#_ Cloud P2P Device _____
__+_Add New Device Type ___
_ Device
_#_Control Panel______Device Management_
_Device Type______________
_#_Device _____________
_ _#_Upgrade Server _____
__+_Add New Device Type ___
Code:Sub DarkBlue() Dim ItBe As String Let ItBe = DarkBlue End SubCode:'Converts the specified text with the VBE Color (Black, Blue or Green) using BB code Private Function BBColor(ByVal Color As Long, ByVal Text As String) As String Dim Msg As String Msg = "[color=" ' http://services.runescape.com/m=forum/forums.ws?278,279,877,64690220 'Msg = Msg & Choose(Color, "black", "blue", "darkgreen") & "]" Msg = Msg & Choose(Color, "blue", "blue", "darkgreen") & "]" ' Custom Colors Wonk Msg = Msg & Text Msg = Msg & "" BBColor = Msg End Function[/color]
Code:Sub Blueviolet() Dim ItBe As String Let ItBe = Blueviolet End Sub
Code:'Converts the specified text with the VBE Color (Black, Blue or Green) using BB code Private Function BBColor(ByVal Color As Long, ByVal Text As String) As String Dim Msg As String Msg = "[color=" ' http://services.runescape.com/m=forum/forums.ws?278,279,877,64690220 'Msg = Msg & Choose(Color, "black", "blue", "darkgreen") & "]" Msg = Msg & Choose(Color, "blue", "blueviolet", "darkgreen") & "]" ' Custom Colors Wonk Msg = Msg & Text Msg = Msg & "" BBColor = Msg End Function[/color]
Attachment 3822
Get-Service|Select-Object name,displayname,starttype|Format-Table -AutoSize|Out-File -FilePath\ 'C:\Users\acer\Desktop\test.txt' -Width 1000
Get-Service|Select-Object name,displayname,starttype|Format-Table -AutoSize|Out-File -FilePath\ 'C:\Users\acer\Desktop\test.txt' -Width 1000
Get-Service|Select-Object name,displayname,starttype|Format-Table -AutoSize|Out-File -FilePath\ 'C:\Users\acer\Desktop\test.txt' -Width 1000
Get-Service|Select-Object name,displayname,starttype|Format-Table -AutoSize|Out-File -FilePath\ 'C:\Users\acer\Desktop\test.txt' -Width 1000
 Posting Permissions

 Reply With Quote
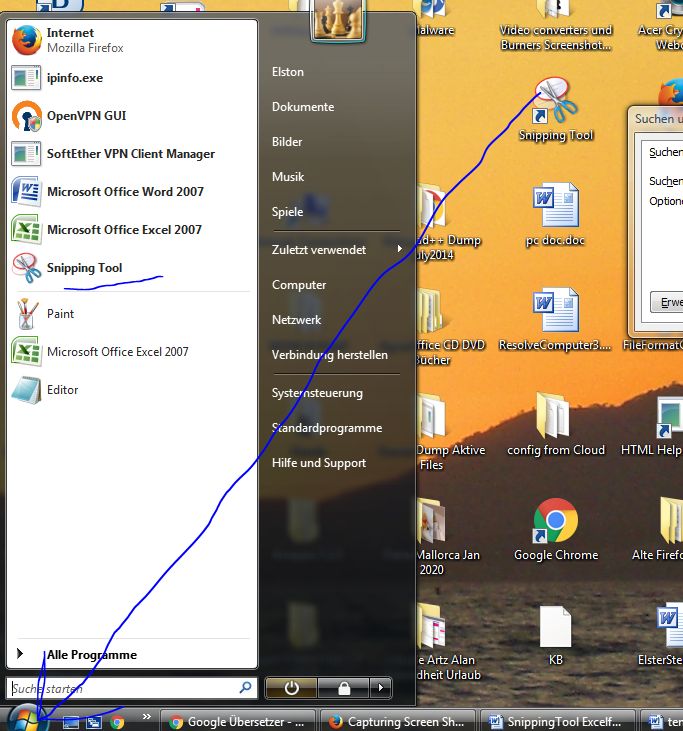
Bookmarks